
(Please also see the intro video "Adding a Chapter and Linked Album" in Help Videos. The video uses Google Photos but the general concept is similar. Specific steps for SmugMug are found below.)
1. VERY IMPORTANT SMUGMUG SETTINGS
Using Share Links allows viewers to be taken directly to your stored Galleries without requiring login credentials and without allowing the viewer to see other Galleries in your account. To use Share Links correctly from SmugMug, you must allow access via Links.
To do this…
- Go to the Organize tab,
- click on the highest-level folder holding Galleries you want to share,
- select Settings > All Galleries Within Folder (just right of Upload Folders)
- select SECURITY & SETTINGS,
- for Visibility, set to “Unlisted (Anyone with the link),
- for Access, set to “Anyone with the Link”.
Note: If visibility is set to Public, viewers may be able to see other Folders and Galleries in your SmugMug collection.
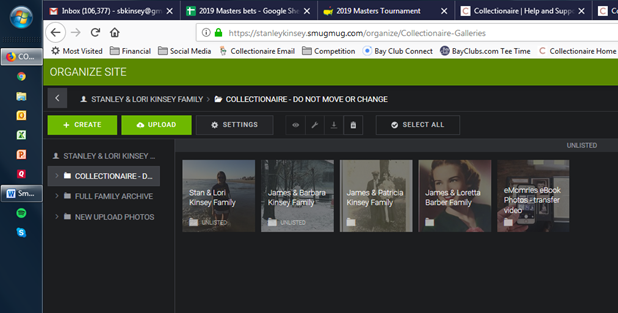
2. Organizing Folders and Galleries - Best Practices
WARNING! - The only negative element of SmugMug, which is not a concern in most other sites, is that if you get a share link for a Gallery and then move that Gallery, you will lose the link.
For clearest view of your Galleries, and for adding to MyFamilyArchive, we suggest that you organize in two ways.
- First, organize your photos into a Full Archive, setting up a master folder for each year, and within each year each month/event. We prefer not going deeper into sublevels as it can be harder to find them later without a search. For example, if we had a family vacation and a birthday party in the same month, we'd organize them as 2002 > Jan > Vacation to Hawaii and 2002 > Jan > Joe's birthday party, rather than nesting both under January.

- Second, set up a separate section for the people in your family tree, placed above your Full Photo Archive, with folders for each peson in your tree. This section will then be a “protected area” where you’ll create galleries for each person and each family that may not naturally be found in your Full Archive. For example, ,a child's collection might include "Best Recitals", "Best of Young Susan", etc. that would comprise photos from many other locations in your Full Archive.

Above you see an example of a separate family folder structure, created above the full archive section…
At the highest level, here is how our folders lay out:
- > COLLECTIONAIRE
- > Our Family
- > Paternal Father and Mother
- > Maternal Father and Mother
Continue to add Folders within each section to have
- > COLLECTIONAIRE
- >Our Immediate Family
- >Family Photos and Videos
- > Father
- > Mother
- > Child 1
- > Child 2
- > etc
- > Paternal Father and Mother
- >Family Galleries
- > Father
- > Mother
- > Child 1 (children other than self)
- > Child 2
- > etc
- > Paternal ancestors
- > Maternal ancestors
- > Maternal Father and Mother
- > Etc.
- >Our Immediate Family
Here is the folder structure…

Knowing that several of these folder levels go deeper still by a few levels, you can start to see the value of using the MyFamilyArchive tree and Media Collection page to get much clearer visibility into each person and family in your collection and what is indexed for them.
3. Uploading Photos
- In SmugMug, you must decide if you are going to upload a Folder or upload photos directly into a Gallery. You cannot move photos into a SmugMug folder.
- Again, we suggest you create separate section from your MyFamilyArchive folders, titles something like “Full Photo Archive” for your uploads. You can then create or copy Galleries into your MyFamilyArchive section and keep each area clean. Our philosophy is to keep all original folders and files intact in our Full Photo Archive section, and then copy photos into newly created, and sometimes matching, MyFamilyArchive gallery.
- If your photos are well-organized in folders in your computer, you can simply move the folder structure into SmugMug and it will hold the organization. (You can move a folder with two additional levels of nested folders within it, but not more than that.)
- If you want to move just selected photos, you need to first create a Gallery “shell” into which you upload the photos.
- To upload, start by clicking the “UPLOAD” button and drag a folder into the desired parent folder in SmugMug, or drag photos from your computer into the new Gallery work space.
4. Creating Galleries
If using our suggested process, you’ll want to create a new Gallery in your MyFamilyArchive section and copy photos from your Full Archive section to this new Gallery.
- To create a new Gallery, go to the folder in your MyFamilyArchive section where the Gallery will reside.
- Click on + CREATE and select Gallery
- Now select the Gallery in your Full Archive section that holds the photos of interest. The photos will now be seen on the right side of the screen.
- Click on the photos you want to add to the new replica Gallery and drag them into the replica Gallery on the left. Choose to “Collect” rather than “Move” when dragging so that your Full Archive maintains its original composition.
Important Note about Deleting a Photo when using “Collect” function
- When you PLEASE KNOW that when you Collect a photo in an additional Gallery that photo becomes a copy of the original. Copy will have a small curved arrow in the lower left corner of the image. If you delete this Copy, the original will not be deleted. But if you delete the Original, ALL Copies WILL be deleted.
5. Set a Gallery Cover Image
This is the image you see at the top of the Gallery. Look for an image that has most of the good detail horizontally at the same level as this image is narrow vertically but very wide.
- Go to Organize > Settings > Appearance > Select Gallery Cover Image.
- Select your chosen photo, click DONE
- Now adjust your photo vertically in the window by clicking on the cross arrow icon in the top left.
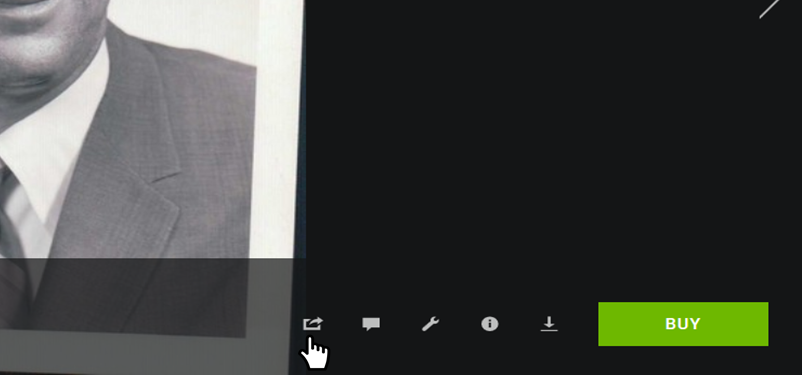
6. To Get Album Link
- Click on the any photo in a Gallery.
- You’ll see several icons in the bottom right or onthe side of the screen.
- Click on the Share Link button, shown below.
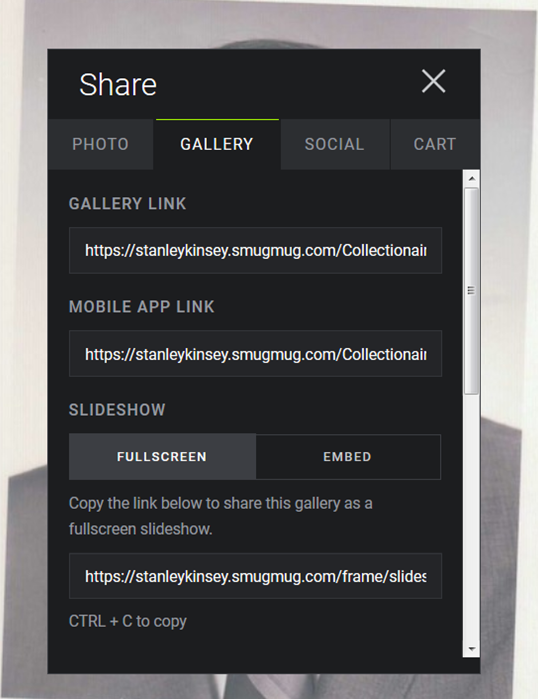
- Select this link and you’ll see a popup box. The PHOTO tab initially appears. But to share the Gallery, click on the GALLERY tab and then copy the GALLERY LINK. This is the link you’ll add to the Linked Album in MyFamilyArchive.
7. Setting A Gallery Preview Image
This is the image that will be picked up by MyFamilyArchive when you click "Generate an Album Preview Image From Link" for this Gallery.
- Go to Organize > Settings > Basics > Feature Image
- Click on the image icon and set an image from your Gallery