
Whereas the "Collection Page" is the core element of MyFamilyArchive, "Chapters and Linked Albums" are the core building blocks of the Collection Page. Here you will create, effectively, a "Table of Contents" of Chapters and Linked Albums for the person or couple. Here is a short video tutorial, followed by written descriptions and instructions.
A "Chapter" is simply a header for a group of similar LInked Albums.
A "Linked Album" is actually an Album name, description and special Web address URL that, when selected, opens a new tab in your browser and takes you to the web address of the actual media located in a different cloud site. MyFamilyArchive uses a specific type of URL called a "Share Link", provided by most third-party cloud sites, that allows the viewer to bypass login credentials for the site and view a specific file or album. This is the central premise of the app .
Adding a Chapter
You must first add at least one Chapter before you can add Linked Albums. Chapters are sections of the collection for that person or family, and the first Chapter could be named something as simple as "Photos". Other examples might be "Young Loretta" (as shown below), “Family Home Videos”, “Family Vacations”, "Joe’s Football Achievements”, “Sue’s Army Years”, “Andrea’s Piano Performances”, etc.
When you tap on the Chapter Title entry box, you will see a drop down menu of title ideas. You may enter your own, select one, or select and edit.
The number of Chapters in a Collection Page is unlimited and you define what the Chapters will be titled, just as if you were writing a book of their life. Each Chapter will then include any number of “Linked Albums”.
To create a new Chapter, click the + ADD CHAPTER button near the top of the Collection Page. You'll then add a Chapter Name and an optional Chapter Description. In most cases, you'll probably not enter a Description in the Chapter as it's meant to be a heading for all your LInked Album Entries there, but you can add a description if you'd like.

After clicking SAVE, your chapters will appear in your Collection Page.

Adding a Linked Album Entry
(Please also see the intro video "Adding a Linked Album to a Collection" in the Help category: Introductory Videos.)
When a Chapter is created, you'll see on the right of the chapter heading the words + ADD LINKED ALBUM. A Linked Album Entry is essentially a link to a digital photo, a digital photo album, a video or other media located in another cloud site. Examples of Linked Album Entries for the Chapter "Young Loretta" (above) could be "eBook of Loretta", "Early Years," and "Loretta after Age 20".
Again, a Linked Album holds no actual media, but instead simply stores a "Share Link," which is a special URL for a digital Album located in a 3rd party cloud site such as iCloud Photos, Google Photos, Flickr, Dropbox, Amazon Cloud, etc. Most all of the major cloud sites use this Share Link concept which bypasses login credentials and allows any viewer with the link to see a selected file or set of files without having permissions to the entire cloud site. This concept is the heart of MyFamilyArchive, which becomes an aggregator of Share Links relating to the lives of people in your Family Tree.
Each Linked Album contains six items of data.
- Album Name
- Album Description
- Share Link
- Preview Image
- Privacy Setting
- Copied Album Paste Option

1. Album Name
The Name reflects the content of the digital media that this Linked Album is linking to in the third party cloud site.
2. Album Description
The desciption is optional and can be of any length you would like. In the case of a video, one might even list the different scenes in the movie, along with the times when these scenes appear.
3. Share Link
The Share Link is the key to how MyFamilyArchive works. The Share Link is not just a "URL", it is a specially generated URL that allows visitors to bypass login credentials and view an item without seeing other items in that collection. You may at first be tempted to just copy the URL in the browser for that media item, but do not do this as this likely will not work correctly as login may be required for a viewer to see their media. Thus, always look for the Share Link function in any cloud site.
This may sound complex at first but but it will soon become quite simple for you. (See the Help Category Cloud Sites, Albums and Links for help in creating your Albums and learning how to get links.)]
4. Preview Image
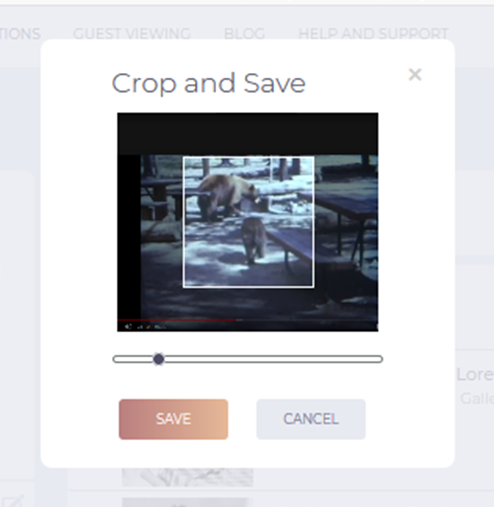
After entering the URL, you will usually click "Generate an Album Preview Image from Link", which in many cases generates a preview image for your Linked Album. Here (shown below) you'll be able to zoom in or out and drag the template to crop the image for your Album Preview Image.
In many cases (e.g. Flickr, iCloud Share Album, Google Photos, etc.) the preview image can be generated and is the same as the Title image created in that Album. In some cases, such as photos stored in iCloud Photos, Google Drive (not to be confused with Google Photos) the site will not allow us to automatically generate this image. In these cases, or if you're not happy with the automatic image generated, you can upload a custom imge for the Album. See the Help FAQ on How do I add a custom Preview photo to an Album or Entry?
5. Privacy Setting
With each Linked Album, you will set a level of privacy. The default for your collection is set in My Accout > Permissions and Preferences > Default Linked Album Privacy.
To understand how Privacy Settings work, view Guest Viewing and Editing Permissions
6. Set Star Rating
A star rating of one to three stars can be set to a Linked Album when created. If you ad more than one Linked Album to an Entry of multiple Linked Albums, the star rating will apply to the set of Linked Albums.
7. Paste Copy of Linked Album
This is an often very convenient feature enabling one to copy all elements of one Linked Album and replicate it elsewhere. It helps if you wish to have the same Linked Album viewed in more than one Collection Page, or move a Linked Album to a different location. Here is the special Help feature to Copying and Pasting a Linked Album.
_______________________________
When saved, your Linked Album will appear as shown below, with an icon or name of the website where your media is stored shown on the right side of the section.

Editing or Adding an Additional Linked Album
Clicking on the edit pencil on the right side of any Linked Album Entry enables an Edit Screen (below), from which you can
a) Edit your Linked Album,
b) Add another Linked Album to this Entry, or
c) Edit the Linked Album Entry summary above should you wish.
Please see detailed instructions in the next Help Topic, Adding Add'l Linked Albums to the Same Linked Album Entry .
